Introduction
In this blog post, we explore the development of a radar system using an Arduino and a servo motor. This project showcases how you can create a simple yet effective radar system to detect objects and visualize their position.
Check out the radar system in action in this YouTube Shorts video. It demonstrates the radar's capabilities and how the data is visualized in real-time.
Hardware Used
- Arduino: The microcontroller that controls the radar system.
- Servo Motor: This motor is used to rotate the radar sensor to scan different angles.
- Radar Sensor: Measures the distance to objects in its path.
Circuit Diagram
Below is the circuit diagram for the radar system:
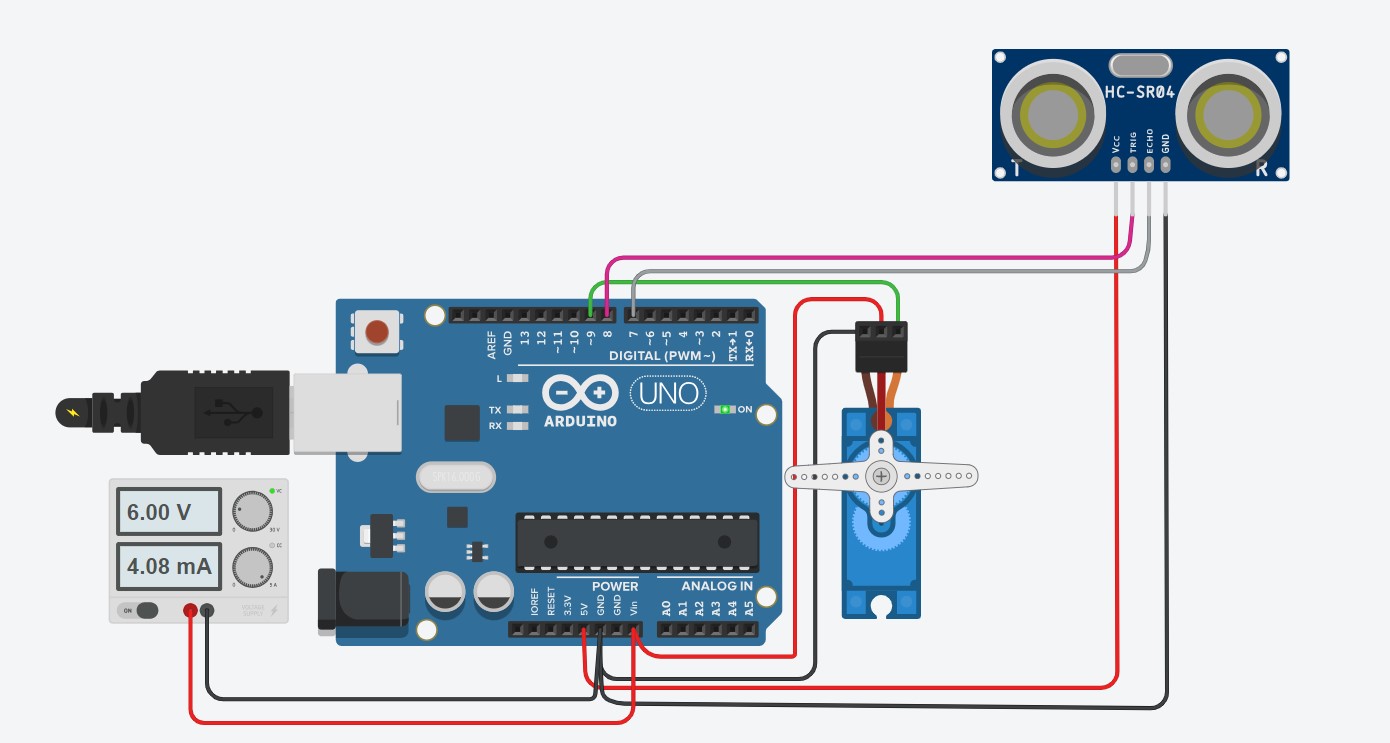
Connection Details
Here are the connection details for the components:
- Ultrasonic Sensor:
- VCC: Connect to 5V on Arduino
- GND: Connect to GND on Arduino
- Trig: Connect to a digital pin on Arduino (e.g., D8)
- Echo: Connect to a digital pin on Arduino (e.g., D7)
- Servo Motor:
- VCC: Connect to 5V on Arduino (Connect an external 6V adapter to Arduino’s DC jack or Vin pin)
- GND: Connect to GND on Arduino
- Signal: Connect to a PWM pin on Arduino (e.g., D9)
Processing Software
To visualize the radar output, we use the Processing software. Processing is a flexible software sketchbook and a language for learning how to code within the context of the visual arts. It is used here to display the radar readings and provide a graphical representation of the detected objects.
How It Works
- Arduino Setup: The Arduino is programmed to control the servo motor and read data from the radar sensor. It continuously rotates the radar sensor and measures the distance to objects at various angles.
- Data Transmission: The distance measurements are sent from the Arduino to the Processing software via serial communication.
- Processing Visualization: In Processing, we create a graphical interface to display the radar output. The software processes the incoming data and updates the radar screen in real-time, showing the distance to objects and their relative positions.
Example Code
Arduino Code:
#include <Servo.h>

#include
    const int trigPin = 8;
    const int echoPin = 7;

    long duration;
    int distance;

    Servo myServo;

    void setup()
    {
      pinMode(trigPin, OUTPUT); // Sets the trigPin as an Output
      pinMode(echoPin, INPUT); // Sets the echoPin as an Input
      Serial.begin(115200);
      myServo.attach(9); // Defines on which pin is the servo motor attached
    }
    void loop()
    {

      for(int i=15;i<=165;i++)
      {
        myServo.write(i);
        delay(30);
        distance = calculateDistance();
        Serial.print(i);
        Serial.print(",");
        Serial.print(distance);
        Serial.print(".");
      }

      for(int i=165;i>15;i--){
      myServo.write(i);
      delay(30);
      distance = calculateDistance();
      Serial.print(i);
      Serial.print(",");
      Serial.print(distance);
      Serial.print(".");
      }
    }

    int calculateDistance()
    {
      digitalWrite(trigPin, LOW);
      delayMicroseconds(2);
      digitalWrite(trigPin, HIGH);
      delayMicroseconds(10);
      digitalWrite(trigPin, LOW);

      duration = pulseIn(echoPin, HIGH);
      distance= duration*0.034/2;
      return distance;
    }
Processing Code:
import processing.serial.*;

Serial myPort;
int[] distances = new int[180];

void setup() {
  size(800, 600);
  myPort = new Serial(this, "COM3", 9600);
  myPort.bufferUntil('\n');
}

void draw() {
  background(255);
  translate(width / 2, height / 2);
  stroke(0);
  noFill();
  ellipse(0, 0, 300, 300);

  for (int i = 0; i < distances.length; i++) {
    float angle = radians(i);
    float distance = distances[i];
    float x = cos(angle) * distance;
    float y = sin(angle) * distance;
    point(x, y);
  }
}

void serialEvent(Serial myPort) {
  String inString = myPort.readStringUntil('\n');
  if (inString != null) {
    inString = trim(inString);
    int angle = (frameCount % 180);
    distances[angle] = int(inString);
  }
}
Conclusion
This radar system project illustrates how to integrate hardware and software to create a functional and interactive radar. By using Processing for visualization, we can gain valuable insights into the radar's performance and the environment it is scanning.